

Sorry, I didn't take many pictures but decided this was a good thing to write up since there isn't much information to be found and what information I found has some inaccuracies that cost me some time. I did this the other day and am doing it from memory so some items may be slightly off but overall it will be fairly accurate and should save you lots of time. This is rather lengthy but that's because I get very descriptive sometimes because I feel more words is better than less when it comes to trying to help someone do something they've never done before.
Things you will need:
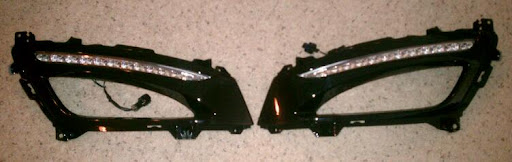
OEM DRL LED housing
OEM fog light covers w/provisions for DRL
6 Screws to install DRL housing (see step #8 for details)
Bosch Relay
Spade connectors to connect to the relay
Lengths of wire, different colors
Electric tape, connectors & whatever you use to do wiring
2-Pin harness/connector
I bought the DRL and fog light cover from here. The cost is $249 shipped and it took 2 weeks from the day of order to receive them. I'm in no way affiliated with them nor do I get any sort of kick back. Just passing along the info.
1) Start off by getting the front end of the car in the air either on ramps or jack stands. Whichever you prefer. Make sure the car is stable & the park brake is set before beginning work.
2) Pop open the hood and begin removing panels. Start with the airbox intake that has two 10mm bolts and then pulls forward. Then remove the black plastic shroud on top of the grill that was partially under the intake duct. There's a couple 10mm bolts and I think 8 of the little plastic screw fasteners that you will quickly learn to love during this process. They back mostly out and then the outter part pulls out. No need to remove the screw all the way.
3) Now, underneath the car you'll need to remove the front undertray that has three 10mm bolts and several (8?) of the plastic screws. Once that's out you'll need to undue the lower panels on wither side of that front tray. There are three or four plastic screws visible from laying underneath it. They attach to the bumper and would prevent it from coming off of the car since we'll be leaving those attached to the car. At this point you should be able to look up inside and see the fog light harness which you should unplug at this time.
4) To the front upper portion of the wheel well. You'll see a small bolt with a philips head screw in it as well. Remove that and I found that either a sock with a long extension or a small screwdriver works best. The screw driver doesn't get as much torque but you shouldn't have to fight it out or back in so the screwdriver is sufficient. Be careful of your fender and wheel as you work here.
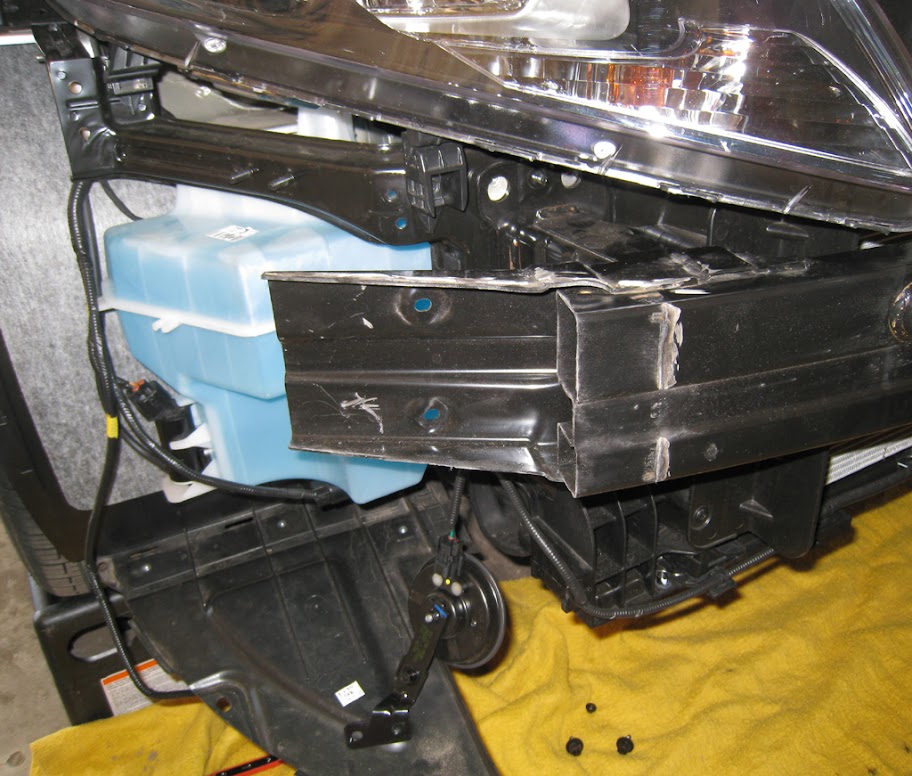
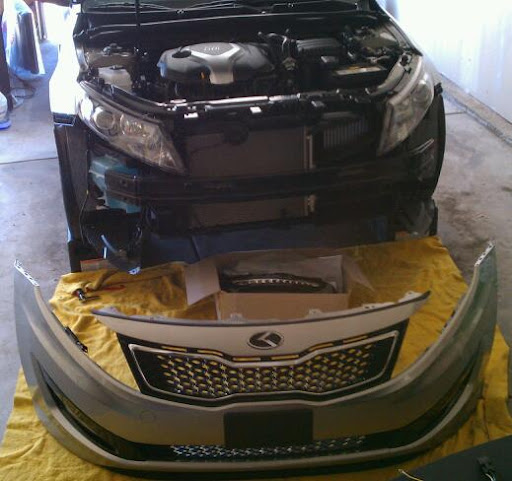
5) Now that all that is off we're going to start removing the actual bumper cover. Lay a soft, clean blanket under the front end to protect it from being scratched. Start where you just removed the bolt inside the wheel well. You'll want to grasp the bumper cover and push the whole thing upward toward the front corner panel as you pull outward which will release it from the three or four tabs that hold it in place (see pic). It will pop outward and you should be able to pull it out fairly far away from the quarter panel area where it was attached. This is the part that cost me a LOT of time and after the fact I figured out a better way to do this. The one write-up I found said you had to access the two nuts and one bolts on each side that were just visible if you pulled outward on the back portion of the bumper cover that you just free'd. I fought this on both sides for some time finding the right tools and pinching my arms trying to wedge them way up in there and was finally successful. I was able to then pull the bumper forward to take off but it was at this point I realized you don't have to do it this way. Those bolts/nuts hold on a bracket that looks like it was designed to grasp the bumper which means it pops right in and out. This means that when you get to the point where you have the outter edges of the bumper cover of you should be able to just pull the bumper cover forward, gently but firmly. These sections just sort of snap on and off and it will make more sense once you see them. Now the entire front bumper section should be free of the car. Note that you'll want to push the top part of the bumper backwards before pulling it off because there are two metal tabs that hold it on place on top that you will see. Place several feet from the front of the car so you have room to work (slide the blanket away from the car as we won't need it at this point for a while).
[IMGhttp://lh3.googleusercontent.com/-K9Wp6Gqy9XI/TftrWbNK3tI/AAAAAAAACCs/UnOkXYyTgLE/IMG_3383.JPG[/IMG]
6) Bumper removal. There are two 10mm nuts (one top, one bottom) and three 12mm bolts (two two top, one bottom) on each side of the bumper holding the bumper supports to the frame. Remove all of those and place under the car on each side for safekeeping. The bumper just pulls straight forward and off. This process takes about 1min and is MUCH safer than doing the next step while the bumper is on the car.
7) Bumper cutting. The US version of the bumper has corners that angle and extend further than the Korean version. Modifications will need to be made so that the DRLs clear. Note: this step may or may not void DOT regulations for the US so do this at your own risk. I know that our crash standards are higher than other countries where this car exists and the bumper ends right where we're going to cut it. You're choice and I'm not responsible for what you decide to do with your car at this point. This step was the hardest for me but can be the easiest depending on what tools you have access too. If you have a plasma cutter you will find this step easier than putting your car on jack stands. I, sadly, do not. I used a 4" angle grinder with a cutting wheel and at first I thought I would get cute and cut the little panels that were welded onto the front to see if this makes enough room (see pic). Don't waste you're time because it doesn't. Best but is to look at where these plates end and are welded to the main bumper support and draw an line with a silver sharpie (or black if you like making things challenging) all the way around so that you will have a straight bumper with two bumper supports when you're done. If you have an airsaw or similar this part should be pretty simple. I, sadly, do not. I wouldn't recommend doing it this way unless you have silver back gorilla strength because you won't be able to get to the back section of the bumper because of the angle of the sides and the support. I had to break it off with me bear (gloved) hands. Think of when you bend the opener of a pop can back and forth until it weakens and you can snap it off. This is 1mm thick aluminum. Now picture the same thing with 1/8" thick steel. lol Needless to say if you aren't a somewhat above average strength fella this can be a chore. Chose your weapons carefully because this step took me many hours and could have been done in about 15min with the info I listed here and the proper tools/preparation. When you are done is an angle grinder to smooth up the rough edges so you don't cut yourself handling it and installing it. Once that's done put several coats of spray paint (any color works since you'll likely never see it again but black is ideal since it's the color of the powder coating on the bumper) to give a nice solid coat to protect from moisture which will lead to oxidation & rust. You can add coats here and there between the next steps. Just make sure you let the paint dry well between coats and then fully before you try to install again.
![Image]()
8) Now back to the bumper cover and the lights. At this point you can begin removing all the phillips screws that hold the fog light housing and the fog light cover to the lower bumper cover. There are a couple underneath that are difficult to see so look carefully before you start to remove. Once they are all out there are several tabs holding things in place. The fog light housing comes out and then you'll want to unsnap the three outside tabs of the center vent to free the fog light housing since it's held in place underneath that. Put the new fog light housing w/LED provision back in place and snap all the little tabs back the way they were with the new cover. Next put the LED housing in the cover and then the fog light housing. Lastly screw them all in. The reason you screw them all in last is you will notice that some holes are shared by different items and if you try to screw them in one item at a time you will have to take some screws out when you need to put another housing in. This will make more sense as you're putting it all back together. Repeat with both sides. You'll need 6 new screws for the DRL housings as they don't come with any. You can get #8 1/2" screws from Home depot that work fine or if you want it to look OEM your Kia parts dept will have them for about $0.28ea and they're the same as the fog light screws which is what the Kia parts dept will have them as in the computer.
9) Electrical wiring. Both of the LED DRLs will have a green/black wire along with a second harness (pink/black I believe) which we won't need. Cut the two green and black wires close to the tape so you have several inches still attached to the LED housing so you have room to work. Do this for both sides. Now you'll need to connect the green to the green and black to the back for both sides. Best bet is to run your wires from the passenger side to the driver's side and make sure you zip tie them along the way. The best spot is above the vent separator between the fog lights and you can run it behind the tabs on top and zip tie through the little tabs as you go. When you get to the driver's side you'll need to use some sort of a T connector. I personally use butt connectors so here I just put both green wires in one side so the other side is open still to attach another wire. You'll need to extend both the green and the black back towards the battery area so that's why you need a T of some sort. You can also add a 2-pin harness at this point to make it easier to remove the bumper cover in the future.
10) Wiring the relay. I saw another thread where he ran into the cab and connected to 12v power which means they will be on whenever the 'key' is on. Generally you want them to turn off whenever the headlights are on since this is how they usually work in OEM applications. So we're going to use a relay to accomplish this effect. Here's the pinout on the relay that we will use:
85: Ground wire
87a: Positive wire from LEDs
86: Positive wire from fog lights
30: Switched 12v wire from fuse box under hood
87: Not used
Now that we have that I can explain where these wires go. The positive wire from the LEDs will be the green wire at the housing or whatever color you used to extend them. The positive wire from the fog lights will be from the harness you unplugged before you removed the bumper. You will need to tap on the car side (not the fog light side) of the connector to get your feed. I cut a 2" section of the loom about half way up to remove it and access the two wires. The black is the ground which we won't need and the red is the positive which we will need for pin #86. There are a couple ways and the easiest is to use a scotch lock or t-splice to connect a wire to this wire or the better way is to spread a section of the insulator and then solder. If you don't know how to solder or do this step then use a scotch lock. They work good enough for this application. The ground you'll want to get from right in front of the battery where you will see another ground already and a 10mm bolt. Run this ground down to the relay and also bring your ground up from your lights (the one next to the green from the LED housing) and connect all three grounds together. Finally you will need a 12v switched source for pin #30. I ran the wire up beside the batter to the fuse box and pulled the 10amp fuse in the top right corner (as you're standing in front of the car) that is labeled A/CC or something to that affect under the lid and wrapped the wire around one leg and stuffed it back in. It's best to use a multimeter at this step to make sure you have a switched power source as well as power at the end of the wire where it will go to the relay to eliminate any wiring problems. Note that I hated wiring it this way and plan to permanently attach this power to a solid switched 12v source at some point but I was running out of time. To me this is a less-than-ideal way of doing things but I know people that have ran fuse box taps like this for years so it will likely be fine, I just prefer a more permanent install than this. Now everything should be wired.
11) Slide you're bumper cover back over and place on a stand of some sort so all of the fog light harnesses and DRL harnesses reach. Plug them all in and turn on the car to check operation. The LEDs should be on when your fog lights are off and when they are on your LEDs should be off. Make sure all lights function normally and if so, the hard part is done. Now it's just a reverse order of most things. Turn off car, remove the harnesses
and move the bumper cover back away from the car so you can replace the bumper. Leave yourself plenty of room to work.
12) Use electric tape to secure the relay to the fog light loom and then electrical tape all the loose wires in one neat package. Don't be afraid to use electrical tape here to make things nice and clean. No loose wires to get caught up on anything.
13) Make sure the paint is thoroughly dry and replace your bumper.
14) When you put your bumper cover back on you'll want to push align this and push it straight into those brackets I was telling you about earlier. It should just 'click' into place on both sides. Then simply lift/pull the sides near the wheel wells so those tabs slide over the other tabs and then replace everything in reverse order. Once you've gotten to this point you shouldn't need any further instruction to put stuff back together.
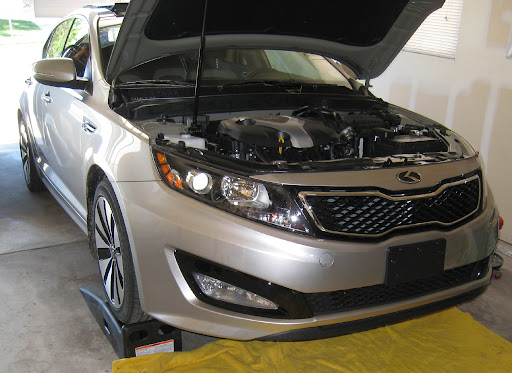
Before
![Image]()
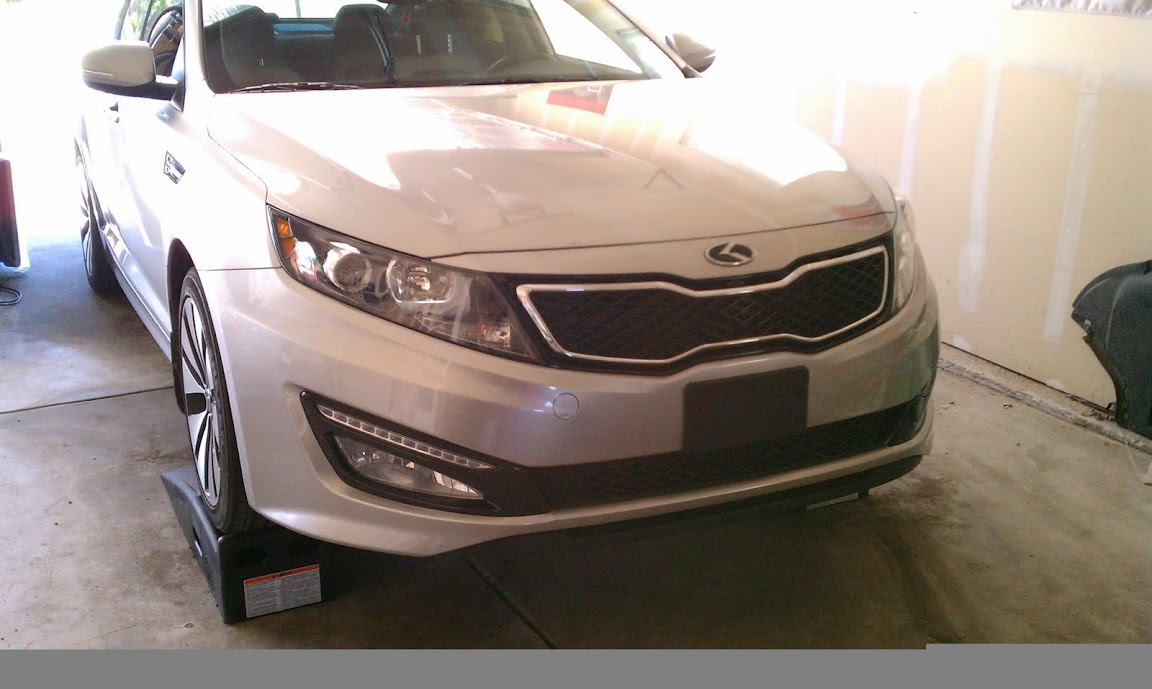
After
![Image]()
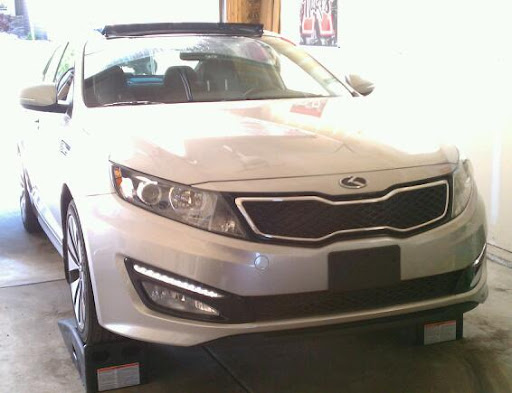
On
![Image]()
Lights
![Image]()
Cover off
![Image]()
Things you will need:
OEM DRL LED housing
OEM fog light covers w/provisions for DRL
6 Screws to install DRL housing (see step #8 for details)
Bosch Relay
Spade connectors to connect to the relay
Lengths of wire, different colors
Electric tape, connectors & whatever you use to do wiring
2-Pin harness/connector
I bought the DRL and fog light cover from here. The cost is $249 shipped and it took 2 weeks from the day of order to receive them. I'm in no way affiliated with them nor do I get any sort of kick back. Just passing along the info.
1) Start off by getting the front end of the car in the air either on ramps or jack stands. Whichever you prefer. Make sure the car is stable & the park brake is set before beginning work.
2) Pop open the hood and begin removing panels. Start with the airbox intake that has two 10mm bolts and then pulls forward. Then remove the black plastic shroud on top of the grill that was partially under the intake duct. There's a couple 10mm bolts and I think 8 of the little plastic screw fasteners that you will quickly learn to love during this process. They back mostly out and then the outter part pulls out. No need to remove the screw all the way.
3) Now, underneath the car you'll need to remove the front undertray that has three 10mm bolts and several (8?) of the plastic screws. Once that's out you'll need to undue the lower panels on wither side of that front tray. There are three or four plastic screws visible from laying underneath it. They attach to the bumper and would prevent it from coming off of the car since we'll be leaving those attached to the car. At this point you should be able to look up inside and see the fog light harness which you should unplug at this time.
4) To the front upper portion of the wheel well. You'll see a small bolt with a philips head screw in it as well. Remove that and I found that either a sock with a long extension or a small screwdriver works best. The screw driver doesn't get as much torque but you shouldn't have to fight it out or back in so the screwdriver is sufficient. Be careful of your fender and wheel as you work here.
5) Now that all that is off we're going to start removing the actual bumper cover. Lay a soft, clean blanket under the front end to protect it from being scratched. Start where you just removed the bolt inside the wheel well. You'll want to grasp the bumper cover and push the whole thing upward toward the front corner panel as you pull outward which will release it from the three or four tabs that hold it in place (see pic). It will pop outward and you should be able to pull it out fairly far away from the quarter panel area where it was attached. This is the part that cost me a LOT of time and after the fact I figured out a better way to do this. The one write-up I found said you had to access the two nuts and one bolts on each side that were just visible if you pulled outward on the back portion of the bumper cover that you just free'd. I fought this on both sides for some time finding the right tools and pinching my arms trying to wedge them way up in there and was finally successful. I was able to then pull the bumper forward to take off but it was at this point I realized you don't have to do it this way. Those bolts/nuts hold on a bracket that looks like it was designed to grasp the bumper which means it pops right in and out. This means that when you get to the point where you have the outter edges of the bumper cover of you should be able to just pull the bumper cover forward, gently but firmly. These sections just sort of snap on and off and it will make more sense once you see them. Now the entire front bumper section should be free of the car. Note that you'll want to push the top part of the bumper backwards before pulling it off because there are two metal tabs that hold it on place on top that you will see. Place several feet from the front of the car so you have room to work (slide the blanket away from the car as we won't need it at this point for a while).
[IMGhttp://lh3.googleusercontent.com/-K9Wp6Gqy9XI/TftrWbNK3tI/AAAAAAAACCs/UnOkXYyTgLE/IMG_3383.JPG[/IMG]
6) Bumper removal. There are two 10mm nuts (one top, one bottom) and three 12mm bolts (two two top, one bottom) on each side of the bumper holding the bumper supports to the frame. Remove all of those and place under the car on each side for safekeeping. The bumper just pulls straight forward and off. This process takes about 1min and is MUCH safer than doing the next step while the bumper is on the car.
7) Bumper cutting. The US version of the bumper has corners that angle and extend further than the Korean version. Modifications will need to be made so that the DRLs clear. Note: this step may or may not void DOT regulations for the US so do this at your own risk. I know that our crash standards are higher than other countries where this car exists and the bumper ends right where we're going to cut it. You're choice and I'm not responsible for what you decide to do with your car at this point. This step was the hardest for me but can be the easiest depending on what tools you have access too. If you have a plasma cutter you will find this step easier than putting your car on jack stands. I, sadly, do not. I used a 4" angle grinder with a cutting wheel and at first I thought I would get cute and cut the little panels that were welded onto the front to see if this makes enough room (see pic). Don't waste you're time because it doesn't. Best but is to look at where these plates end and are welded to the main bumper support and draw an line with a silver sharpie (or black if you like making things challenging) all the way around so that you will have a straight bumper with two bumper supports when you're done. If you have an airsaw or similar this part should be pretty simple. I, sadly, do not. I wouldn't recommend doing it this way unless you have silver back gorilla strength because you won't be able to get to the back section of the bumper because of the angle of the sides and the support. I had to break it off with me bear (gloved) hands. Think of when you bend the opener of a pop can back and forth until it weakens and you can snap it off. This is 1mm thick aluminum. Now picture the same thing with 1/8" thick steel. lol Needless to say if you aren't a somewhat above average strength fella this can be a chore. Chose your weapons carefully because this step took me many hours and could have been done in about 15min with the info I listed here and the proper tools/preparation. When you are done is an angle grinder to smooth up the rough edges so you don't cut yourself handling it and installing it. Once that's done put several coats of spray paint (any color works since you'll likely never see it again but black is ideal since it's the color of the powder coating on the bumper) to give a nice solid coat to protect from moisture which will lead to oxidation & rust. You can add coats here and there between the next steps. Just make sure you let the paint dry well between coats and then fully before you try to install again.
8) Now back to the bumper cover and the lights. At this point you can begin removing all the phillips screws that hold the fog light housing and the fog light cover to the lower bumper cover. There are a couple underneath that are difficult to see so look carefully before you start to remove. Once they are all out there are several tabs holding things in place. The fog light housing comes out and then you'll want to unsnap the three outside tabs of the center vent to free the fog light housing since it's held in place underneath that. Put the new fog light housing w/LED provision back in place and snap all the little tabs back the way they were with the new cover. Next put the LED housing in the cover and then the fog light housing. Lastly screw them all in. The reason you screw them all in last is you will notice that some holes are shared by different items and if you try to screw them in one item at a time you will have to take some screws out when you need to put another housing in. This will make more sense as you're putting it all back together. Repeat with both sides. You'll need 6 new screws for the DRL housings as they don't come with any. You can get #8 1/2" screws from Home depot that work fine or if you want it to look OEM your Kia parts dept will have them for about $0.28ea and they're the same as the fog light screws which is what the Kia parts dept will have them as in the computer.
9) Electrical wiring. Both of the LED DRLs will have a green/black wire along with a second harness (pink/black I believe) which we won't need. Cut the two green and black wires close to the tape so you have several inches still attached to the LED housing so you have room to work. Do this for both sides. Now you'll need to connect the green to the green and black to the back for both sides. Best bet is to run your wires from the passenger side to the driver's side and make sure you zip tie them along the way. The best spot is above the vent separator between the fog lights and you can run it behind the tabs on top and zip tie through the little tabs as you go. When you get to the driver's side you'll need to use some sort of a T connector. I personally use butt connectors so here I just put both green wires in one side so the other side is open still to attach another wire. You'll need to extend both the green and the black back towards the battery area so that's why you need a T of some sort. You can also add a 2-pin harness at this point to make it easier to remove the bumper cover in the future.
10) Wiring the relay. I saw another thread where he ran into the cab and connected to 12v power which means they will be on whenever the 'key' is on. Generally you want them to turn off whenever the headlights are on since this is how they usually work in OEM applications. So we're going to use a relay to accomplish this effect. Here's the pinout on the relay that we will use:
85: Ground wire
87a: Positive wire from LEDs
86: Positive wire from fog lights
30: Switched 12v wire from fuse box under hood
87: Not used
Now that we have that I can explain where these wires go. The positive wire from the LEDs will be the green wire at the housing or whatever color you used to extend them. The positive wire from the fog lights will be from the harness you unplugged before you removed the bumper. You will need to tap on the car side (not the fog light side) of the connector to get your feed. I cut a 2" section of the loom about half way up to remove it and access the two wires. The black is the ground which we won't need and the red is the positive which we will need for pin #86. There are a couple ways and the easiest is to use a scotch lock or t-splice to connect a wire to this wire or the better way is to spread a section of the insulator and then solder. If you don't know how to solder or do this step then use a scotch lock. They work good enough for this application. The ground you'll want to get from right in front of the battery where you will see another ground already and a 10mm bolt. Run this ground down to the relay and also bring your ground up from your lights (the one next to the green from the LED housing) and connect all three grounds together. Finally you will need a 12v switched source for pin #30. I ran the wire up beside the batter to the fuse box and pulled the 10amp fuse in the top right corner (as you're standing in front of the car) that is labeled A/CC or something to that affect under the lid and wrapped the wire around one leg and stuffed it back in. It's best to use a multimeter at this step to make sure you have a switched power source as well as power at the end of the wire where it will go to the relay to eliminate any wiring problems. Note that I hated wiring it this way and plan to permanently attach this power to a solid switched 12v source at some point but I was running out of time. To me this is a less-than-ideal way of doing things but I know people that have ran fuse box taps like this for years so it will likely be fine, I just prefer a more permanent install than this. Now everything should be wired.
11) Slide you're bumper cover back over and place on a stand of some sort so all of the fog light harnesses and DRL harnesses reach. Plug them all in and turn on the car to check operation. The LEDs should be on when your fog lights are off and when they are on your LEDs should be off. Make sure all lights function normally and if so, the hard part is done. Now it's just a reverse order of most things. Turn off car, remove the harnesses
and move the bumper cover back away from the car so you can replace the bumper. Leave yourself plenty of room to work.
12) Use electric tape to secure the relay to the fog light loom and then electrical tape all the loose wires in one neat package. Don't be afraid to use electrical tape here to make things nice and clean. No loose wires to get caught up on anything.
13) Make sure the paint is thoroughly dry and replace your bumper.
14) When you put your bumper cover back on you'll want to push align this and push it straight into those brackets I was telling you about earlier. It should just 'click' into place on both sides. Then simply lift/pull the sides near the wheel wells so those tabs slide over the other tabs and then replace everything in reverse order. Once you've gotten to this point you shouldn't need any further instruction to put stuff back together.
Before
After
On
Lights
Cover off
")


